Installing a pan tilt camera on a car roof can enhance your driving experience. This camera offers improved visibility and safety. Knowing how to install a pan tilt camera on a car roof is essential for any car enthusiast or safety-conscious driver.
Many might think the process is complicated, but it can be straightforward with the right approach. Start by gathering your tools and making sure you have a reliable camera. You’ll need a secure mount that can withstand various weather conditions. Each step in the installation is critical for functionality and durability. It’s important to consider the wiring and power source carefully.
Don’t overlook the potential challenges. Ensure that your camera has a clear view and is securely attached. If the installation isn’t perfect, the camera may not function as intended. This guide will help streamline the process while addressing common mistakes. With patience and attention to detail, you can achieve professional results.
When choosing a pan tilt camera for your car roof, consider several key factors. First, think about the camera's resolution. A higher resolution ensures sharper images, especially when capturing details on the road. Look for cameras that offer at least 1080p clarity. This choice impacts video quality significantly.
Next, assess the camera's range of motion. A pan tilt camera should provide 360-degree pan and a good tilt range. This flexibility helps capture more angles without repositioning your vehicle. Additionally, check the ease of installation. Some cameras come with detailed instructions, while others might require professional help. Ensure you select a model that suits your technical skills.
Budget is crucial. You don’t have to break the bank, but spending a little more often yields better quality. Compare different options and seek expert reviews to inform your decision. Planning ahead reduces the risk of purchasing an unsuitable camera. Remember, balance features with your budget to avoid buyer's remorse. Your choice will affect your overall experience.
When installing a pan tilt camera on your car roof, having the right tools and materials is essential. You'll need a power drill, mounting brackets, and screws. A sturdy adapter or a suction mount will ensure stability. Don’t forget waterproofing tape to protect the camera from moisture.
Before starting, double-check that all your tools are functional. A faulty drill might waste time. Be mindful of how you position the camera. An improper angle can lead to poor footage quality.
While installing, it's crucial to secure each component tightly. Loose screws can cause the camera to wobble or detach.
Consider your power source. If using battery-operated cameras, ensure batteries are fully charged. A power cable may be necessary for continuous use. Practice patience during installation. Rushing can lead to mistakes that might require redoing the work. Always test the camera before finalizing the installation to avoid surprises later.
Installing a pan tilt camera on your car roof is an exciting project. It can enhance your outdoor experience, whether for road trips or photography. Start by gathering your tools: a drill, mounting brackets, and wiring. Ensure you select a suitable location on the roof. It should be stable and unobstructed for the camera's full range of motion.
Once the location is decided, mark the holes for drilling. Use a level to make sure it’s straight. Drilling can be intimidating, especially if you're not experienced. Take your time and double-check your measurements. After drilling, attach the mounting brackets securely. Proper installation ensures the camera won’t dislodge during movement.
Connecting the wiring requires patience. It’s crucial to follow the instructions carefully. A common mistake is overlooking the power source. Ensure the wires are protected and neatly tucked away to avoid damage. Mistakes can happen—don't rush. Take a moment to recheck every connection before finalizing the installation. This attention to detail can save you from future issues.
Installing a pan-tilt camera on your car roof can enhance your surveillance capabilities. To connect the camera to power, you'll need a reliable power source. Consider running a wire from your car’s battery to the camera. Ensure you use appropriate wire gauges to handle the power demand. Use heat-shrink tubing to protect connections from moisture and grime. This not only secures the connections but also extends the lifespan of your setup.
For video transmission, you can opt for either wired or wireless solutions. A wired connection offers reliability, while a wireless setup adds convenience. If going wired, use quality coaxial cables. Make sure all the connections are tight and secure, as loose connections can cause video interference. On the other hand, if you select a wireless system, be mindful of signal strength. Location matters; obstacles like metal roofs can weaken your signal.
Remember, installation can be a trial-and-error process. Check your connections multiple times. If video quality is subpar, revisit your wiring. It's better to invest time upfront rather than troubleshoot later. Ensuring a strong, stable connection will save you frustration down the road. Regularly inspect your setup as well; conditions can change, affecting performance.
After installing a pan tilt camera on your car roof, testing its functionality is essential. Begin by checking the camera’s alignment. Ensure it captures the desired field of view. Adjusting the tilt and pan settings can make a significant difference. If the camera is misaligned, it might not provide the coverage you need. Take your time to fine-tune these angles.
One tip is to record a short video while driving. This allows you to assess the camera's performance in real-time. Look for any issues with the video quality or lag. If the footage is shaky, you may need to adjust the mounting position. Achieving stable recordings can be tricky, and it might require several attempts to find the best spot.
Additionally, check the camera's remote control or app settings. Familiarize yourself with the features. Look for options like motion detection or presets. Not all cameras perform equally in different environments. You may encounter challenges in low-light conditions. Patience is key when making adjustments. Keep testing until you achieve the desired results.
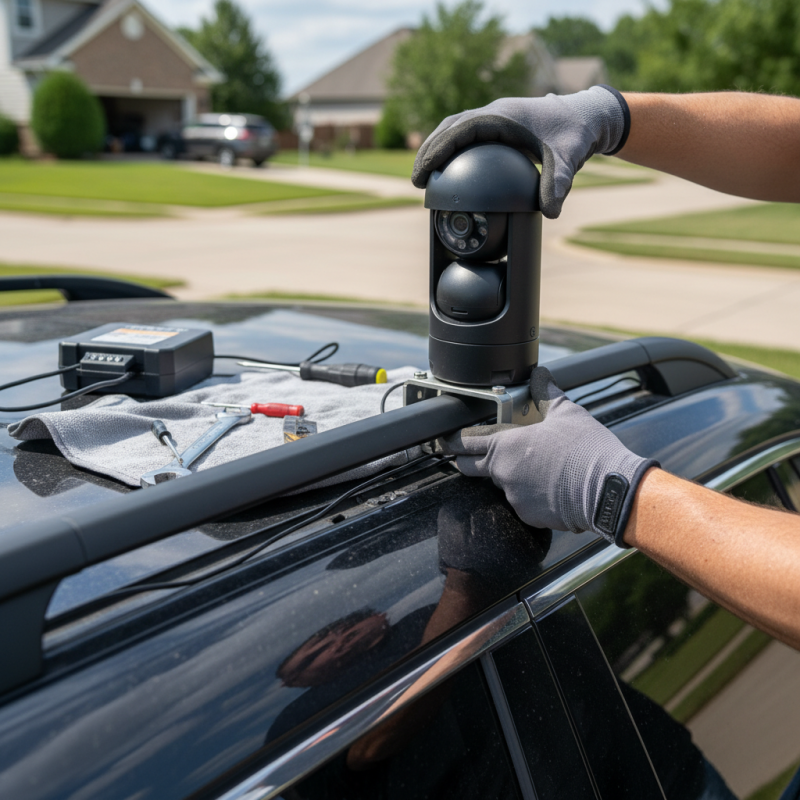
: You will need a power drill, mounting brackets, screws, and waterproofing tape.
Proper positioning affects footage quality. An improper angle can lead to poor results.
Check all tools before starting. A faulty drill can waste valuable time.
Use a sturdy adapter or suction mount. Secure all components tightly to avoid wobbling.
Verify the camera’s alignment and adjust the tilt and pan settings for optimal view.
Record a short video while driving. Assess video quality and stability during the test.
Not all cameras perform well in low-light. You may need special adjustments or settings.
Rushing can lead to mistakes. Take your time to achieve better results with adjustments.
Adjust the mounting position. Stable recordings may require multiple attempts to perfect.
Yes, understanding features like motion detection can improve your overall experience.
In this article titled "How to Install a Pan Tilt Camera on Your Car Roof Easily," readers will learn the essential steps involved in successfully mounting this versatile camera. The guide starts with choosing the right pan tilt camera tailored for your vehicle, considering factors like compatibility and functionality. It then details the necessary tools and materials required for the installation process, ensuring you are well-prepared.
The heart of the article is a comprehensive step-by-step guide on how to install a pan tilt camera on a car roof, walking you through each phase of the installation. After proper mounting, the article covers how to connect the camera to power and video systems. Finally, it emphasizes the importance of testing the camera functionality and making any necessary adjustments to ensure optimal performance. This straightforward approach will empower anyone interested in enhancing their vehicle's surveillance capabilities.
HawkEye Camera